Hi,
Actually, your CMU is bricked. I did the exact same thing as you where my car was turned off just after installing the failsafe package. Luckily there is a way to recover, which is not so easy to do, bit it's quiet doable if you are not afraid to unmount the CMU, open it and plug some wires.
Full explanation:
Thanks to this website:
http://www.2x4logic.com it saves me a lot of time to dig on how the system works. The CMU update process is indeed very badly designed, as it has plenty of failure points where it ends with a bricked device that will not boot anymore. The easiest way to do that is by shutting the CMU off after the failsafe package installation. Basically what happens is that a small flash chip that contains the boot program has a flag on it that decides on which system it has to boot. It can either be the normal Mazda system, or the «*failsafe*» software. When you install the failsafe update package without the 2nd reinstall package, the flash chip boot select mode is set to boot on the ibc1 partition, which does not match the current Mazda system. This ibc1 partition is updated by the reinstall package. So it’s bricked because it cannot boot anymore.
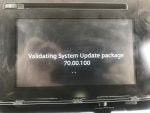
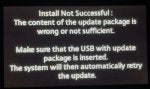
The easiest fix here is to change the boot select value on the flash chip to boot on ibc2 (the failsafe). This is normally done by the update process, after the reinstallation package is checked for integrity. Here we are going to do it by forcing the boot. It will start the «*failsafe*» installation software, that will tell us that installation fails and that we can retry by putting a USB key into the car with a correct reinstallation package. Then the installation will continue and finish.
Tutorial:
Here is a step by step tutorial on how to achieve this. Be aware that It can be hard to do this if you do not understand what you are doing. But in case your CMU is bricked (black screen after a failed upgrade or so) you have nothing to loose, right? Bringing the car to a dealer will not help, they will just charge you for a full CMU replacement, and that costs a lot…
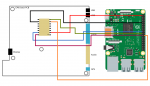
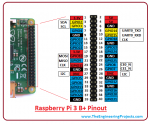
The flash chip is placed on the back of the CMU’s PCB. It’s a NOR SPI Flash. The idea is to directly connect to this chip and use a raspberry pi (that has an SPI bus) to reprogram the memory.
Required hardware:
- A raspberry pi
- A Programmer Test Clip SOIC16 or 6x IC Test clips (I used test clips)
- A breadboard to do the connections
On the raspberry pi, you need to install Raspbian (Lite version is ok). From a fresh install of Rasbian, setup the pi to have SPI enabled by running:
Code:
sudo raspi-config
(enable SPI in Interfacing Options*)
sudo reboot
Install some required tools:
Code:
sudo apt-get update
sudo apt-get install build-essential libusb-1.0-0-dev libusb-dev git wget curl libpci-dev
Get a newer version of flashrom:
Code:
git clone [url]https://github.com/flashrom/flashrom[/url]
cd flashrom
make
sync
Shut the power off of the raspberry.
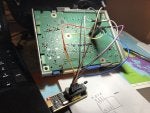
Now the raspberry pi is ready. Unmount the CMU from your car (look on youtube for video on how to do it, it’s easy), unscrew the PCB from the CMU and plug the wires from the raspberry to the flash chip like here (see attached pic) and
http://www.2x4logic.com/mcbot-annotated.jpg
Turn the raspberry pi on. And check if the flash is detected:
Code:
cd flashrom
./flashrom -p linux_spi:dev=/dev/spidev0.0,spispeed=8000
This will tell if a chip is detected or not. If not your wiring is not ok. When something is detected, flashrom may tell you that multiple different chips are detected. That’s because some chips from a same manufacturer can have the same protocol. You need to read the right device model from what is written on the chip. I had a MX25L6445E. I know that some other CMU may have a different chip model. It should also work if flashrom can detect it.
Then try to read the memory and do a backup:
Code:
./flashrom -r backup-cmu.bin -c "MX25L6436E/MX25L6445E/MX25L6465E/MX25L6473E/MX25L6473F" -V -p linux_spi:dev=/dev/spidev0.0,spispeed=8000
Carefully read what flashrom is doing to check of any failure. I had to use the option -c "MX25L6436E/MX25L6445E/MX25L6465E/MX25L6473E/MX25L6473F" to select the right chip model in flashrom as it was written when using the -p option (list all detected devices)
Once you have the backup, we modify the boot-select byte inside the file
Code:
cp backup-cmu.bin cmu-mod.bin
printf '\x00' | dd of=cmu-mod.bin bs=1 seek=65536 count=1 conv=notrunc
Now it’s time to write the modified file to the flash:
Code:
./flashrom -w cmu-mod.bin -c "MX25L6436E/MX25L6445E/MX25L6465E/MX25L6473E/MX25L6473F" -V -p linux_spi:dev=/dev/spidev0.0,spispeed=8000
Read back the flash to verify it worked
Code:
./flashrom -r cmu.bin -c "MX25L6436E/MX25L6445E/MX25L6465E/MX25L6473E/MX25L6473F" -V -p linux_spi:dev=/dev/spidev0.0,spispeed=8000
Check if the file matches by verifying the checksum
Code:
sha1sum cmu.bin cmu-mod.bin
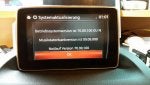
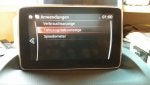
The checksum should match, if they do, the procedure is done. It’s time to unplug everything and put the CMU back in the car. The CMU should boot into the failsafe recovery system and ask you for a USB key with the reinstall package.
Good luck, and happy hacking!
")