Here's a writeup on how to mount your Dashcam, without removing any pillars or hardwiring the dashcam.
I'm pretty satisfied with the outcome and hence i'm sharing the photos and a video sample.
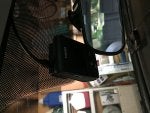
Dashcam G1W-CB
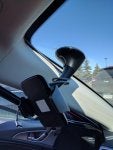
Tried several positions, this came out least obtrusive and most functional.
![Image]()
Wire was simply tucked under the ceiling lining
![Image]()
Pushed in between the plastic pillar and the lining
![Image]()
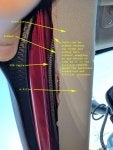
Down the pillar in between the rubber seal and the pillar
![Image]()
All the way down under the kick plate (spot the wire coming out under the seat)
![Image]()
Under the driver's seat and to the arm rest compartment
![Image]()
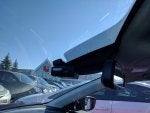
Exterior view
![Image]()
Video Sample (Link to youtube)
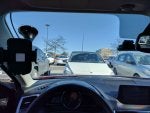
Angle is wide enough to capture the right side of the car.
Only downside is the black windshield sensors compartment showing in the video.
This guy almost hit me, right off the signal, changed lanes without even checking.
I'm pretty satisfied with the outcome and hence i'm sharing the photos and a video sample.
Dashcam G1W-CB
Tried several positions, this came out least obtrusive and most functional.

Wire was simply tucked under the ceiling lining

Pushed in between the plastic pillar and the lining

Down the pillar in between the rubber seal and the pillar

All the way down under the kick plate (spot the wire coming out under the seat)

Under the driver's seat and to the arm rest compartment

Exterior view

Video Sample (Link to youtube)
Angle is wide enough to capture the right side of the car.
Only downside is the black windshield sensors compartment showing in the video.
This guy almost hit me, right off the signal, changed lanes without even checking.

")