Ok so i really wanted the interior lighting and turns out the 2011 MZ3 doesn't even have the connection for the footwell lighting. I didn't want to cut nor splice wires and i also wanted my set up to turn on when the door opened and turn off when the door closed. After much search on the forum i could only find versions of what i wanted but not all together, so i set out to make my own guide. Please no judging as this has worked for me so far and without any complications. You are responsible for any damages on your car as i was on my own
") , this is based out of a 2011 MZ3. If you have any questions please PM or just post here and i will answer them as i can.
, this is based out of a 2011 MZ3. If you have any questions please PM or just post here and i will answer them as i can. items you will need.
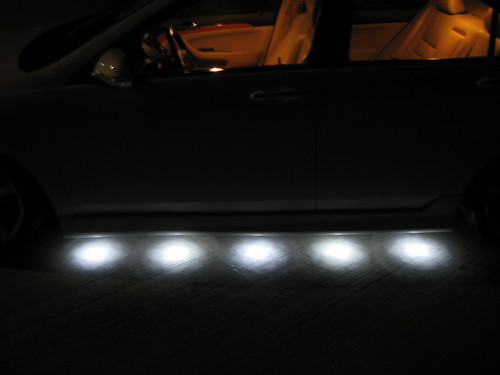
LEDs from auto zone, i got the ones for under the car (comes four to a package each w/ wires, 12V, Blue)
Electrical Tape
speaker wire
Flat head screwdriver
Phillips screwdriver
blade or wire stripper
flashlight
A whole lot of patience and hair in a scrunchy.
1. Ok lay everything out on the backseat as you will need access to both sides of the car and you might work odd angles.
2. make sure the dome lights/map lights are off and the key is not in the ignition and unplug the negative side of the battery as you r working kinda close to the Airbag and u don't want to get punched right in the face at ~200mph.
3. Ok you have to pull out the housing for the map lights so you have access to the electrical part of behind it as well as pull the wire in from within the roof. for this use the flathead screwdriver and and pop the lenses out of each of the map lights CAREFULLY without breaking them. the plastic scratches easy so i wrapped mine in one of my sleeves and did it that way.
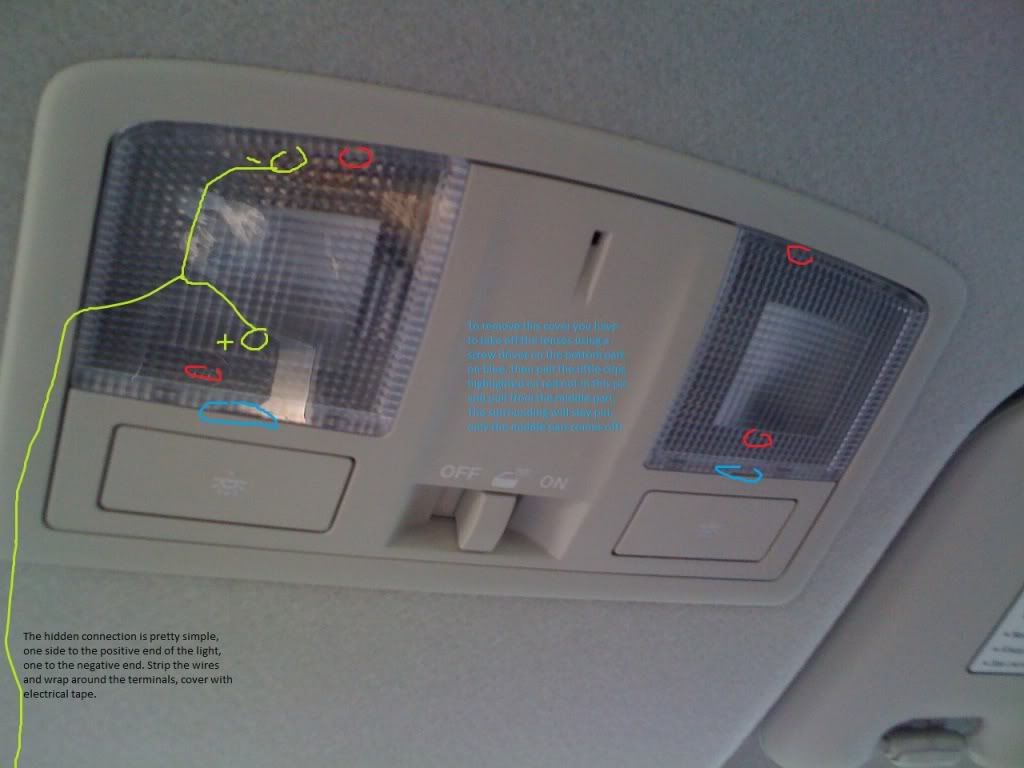
4. Once the lenses r popped you will see four clips holding onto the housing. the outer part of the dome lights doesn't come off, just the middle. Using the flathead pop each one of the clips there are two on each side one up one down. while you pop them try to push from the middle so they let go eventually, this is a slow process but shouldn't take more than two minutes and its all logic if you look at whats holding it.
Once its out its gonna hang from the harness, i didn't unplug it as I'm not stealing power from it but rather from the light bulb terminals instead.
5. Measure from the dome light to the A pillar where the airbag is and down from the door to about where the clutch is, thats as much as you r gonna need PER SIDE. leave a bit extra so u don't have to keep adding to it.
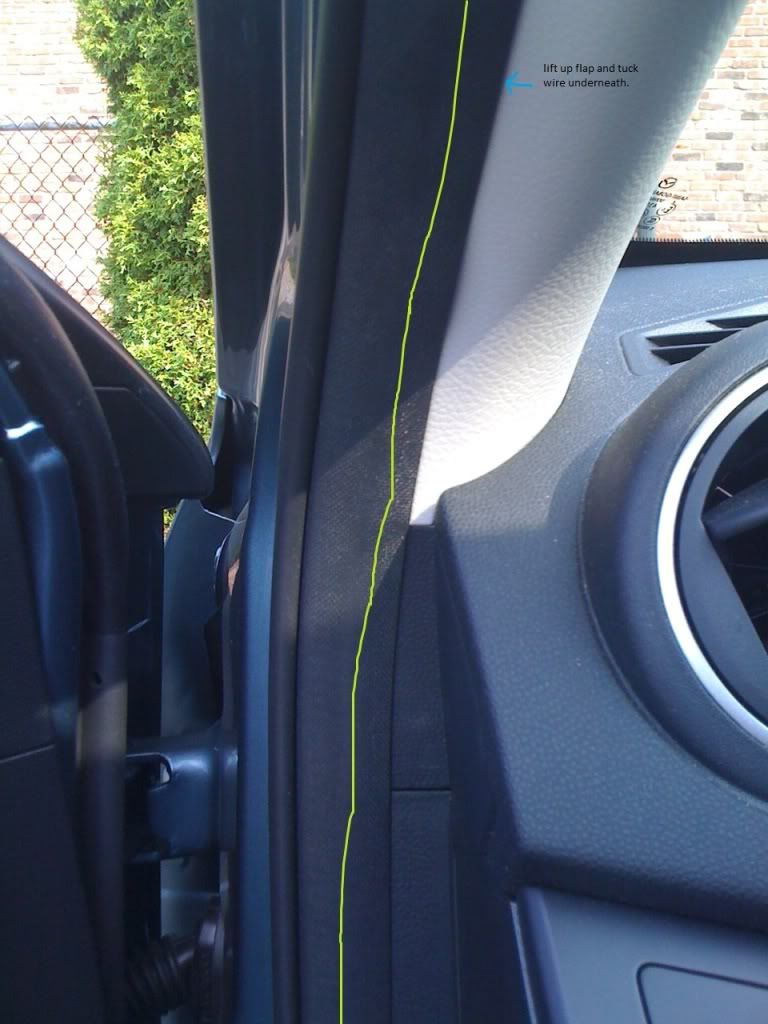
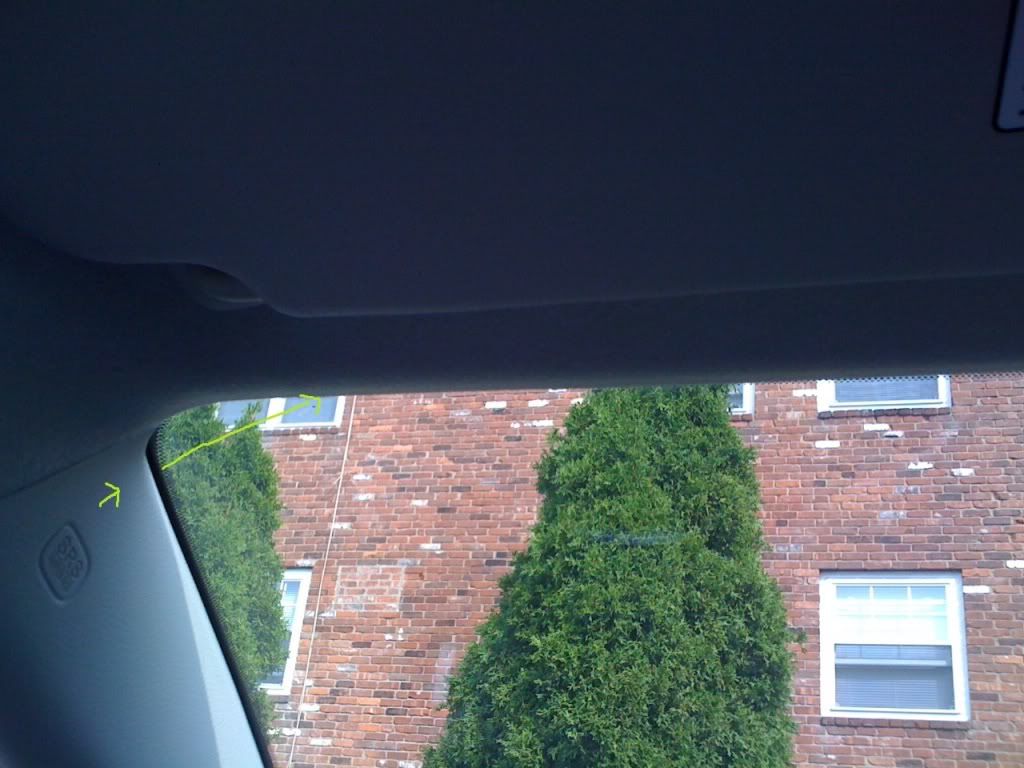
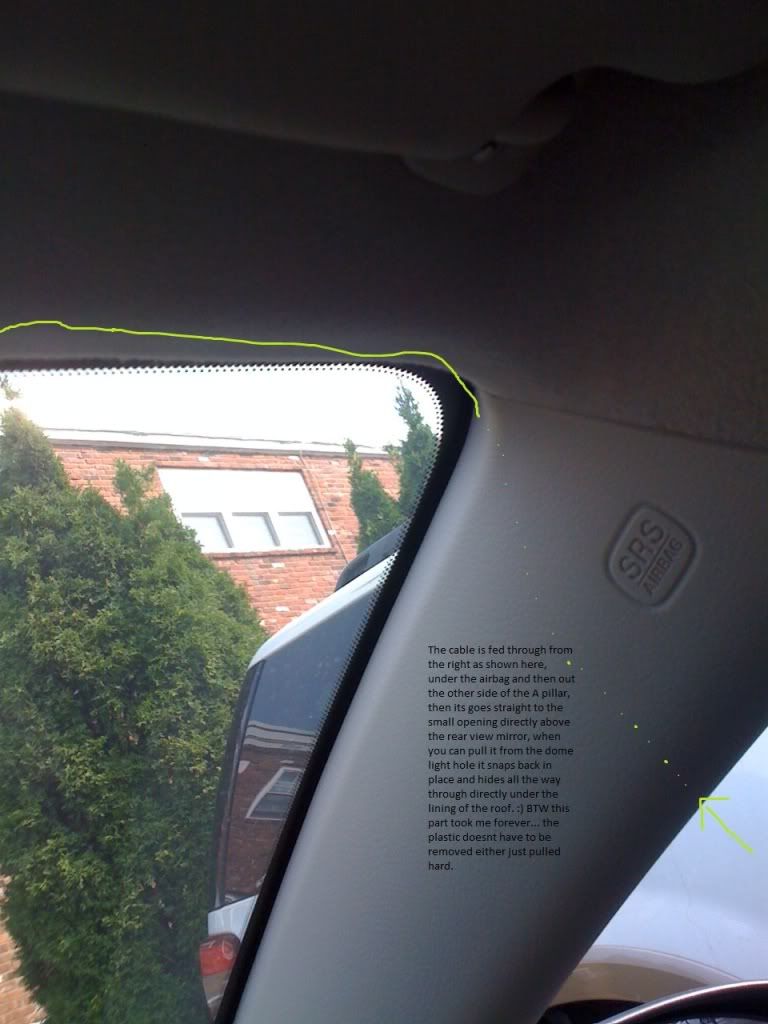
6. Once you cut it pry open the little rubber part on that holds the plastic Airbag A pillar and and the door. This isn't with glue or anything it folds right back into place once you let go so its safe to work your way around this. Pull it back and pry a bit of the plastic part holding the Airbag. by now you will see the airbag rolled around the A pillar nice n neat, just fit your fingers through this and slide the cable FROM BEHIND THE AIRBAG, incase it ever deploys it goes smooth and its not held back by some wire lol. This part takes a while tho, maybe the longest. The objective is to fish the cable from the outside of the A pillar to the very corner where the windshield meets the metal. I used the flashlight and about a half hour. Once you can finally get the wire through just pull it until the desired length.
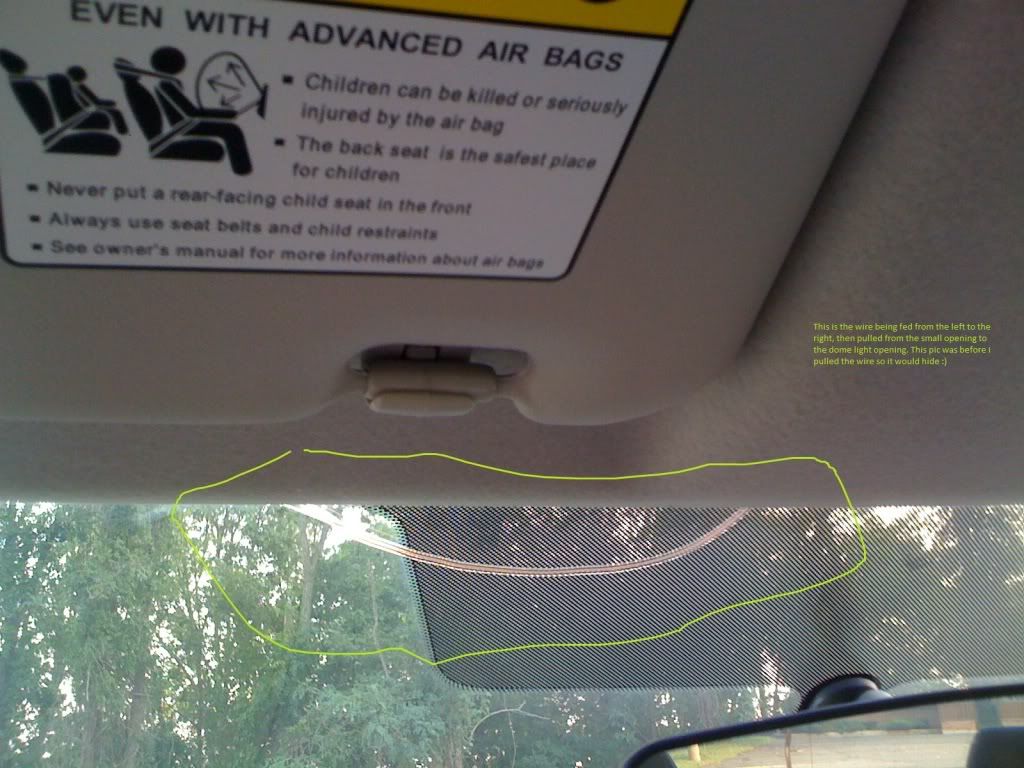
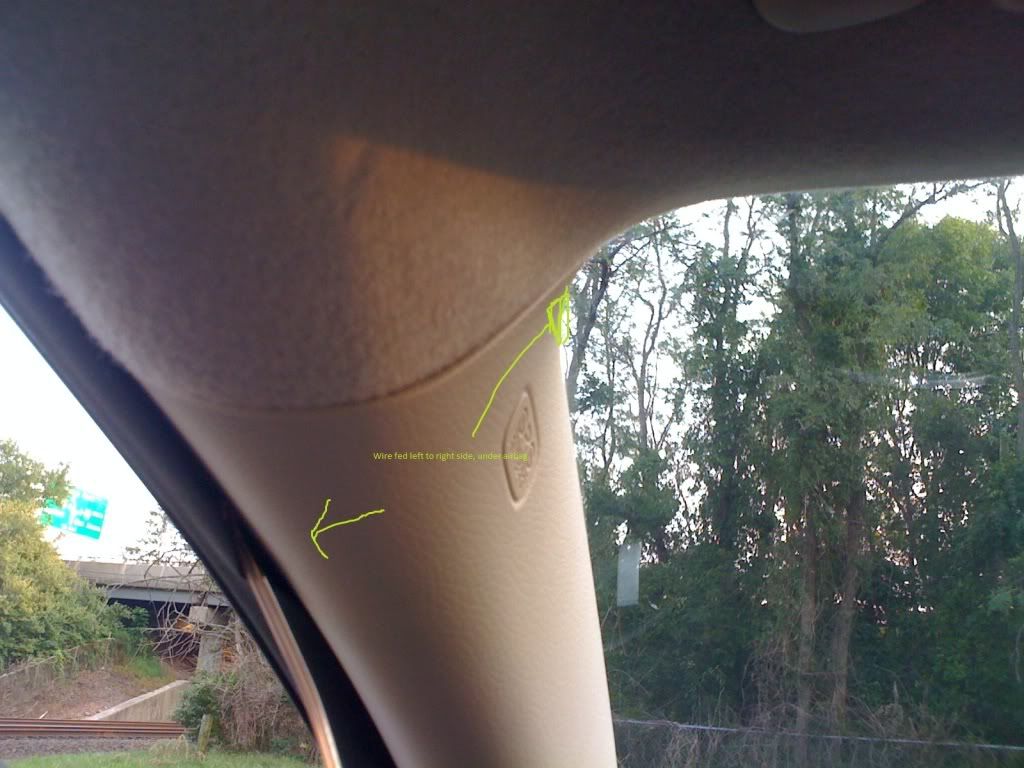
7. Grab the end you pushed through and pull a bit, theres an opening right above the rearview mirror on the roof lining, slide the cable in there and slide your hand on the hole from the dome lights housing and with both hands try to find that wire so you can pull it through the hole. It might seem like theres no way but believe me there is, just push down a bit on the lining SOFTLY don't wanna push too hard when you find it just pull and the rest of the wire is going to hide inside of the lining making it really stealthy
btw I'm a 119lbs girl so my hands r small, if you have big hands it might b a bit harder to get em through that opening as its pretty tight. 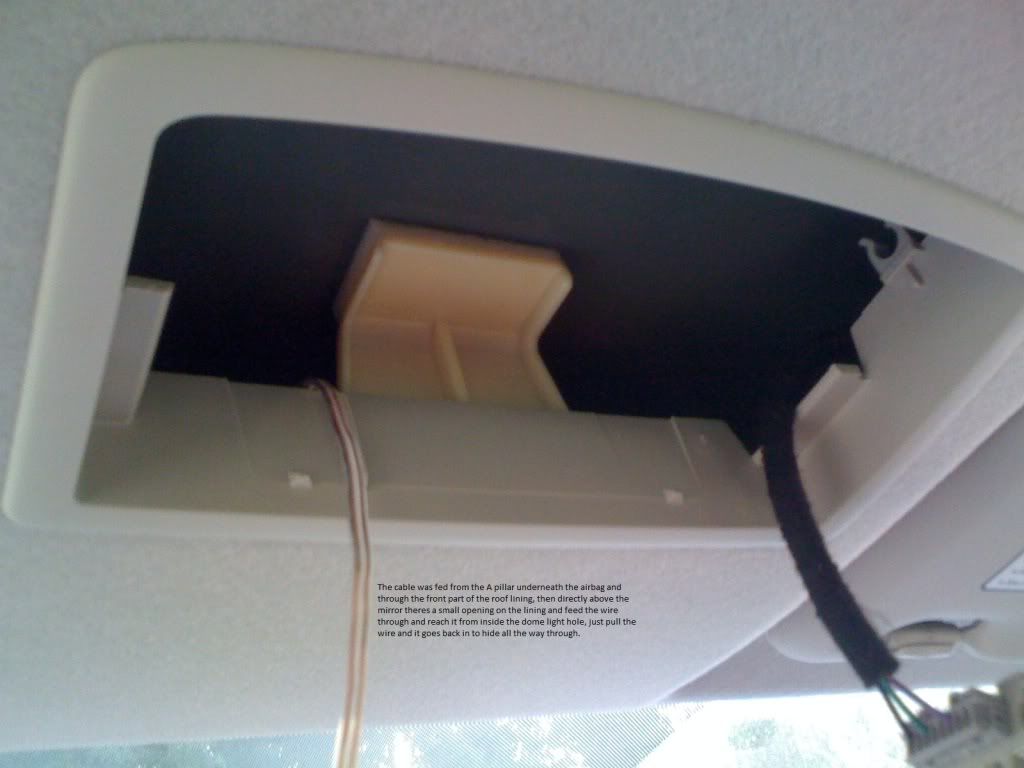

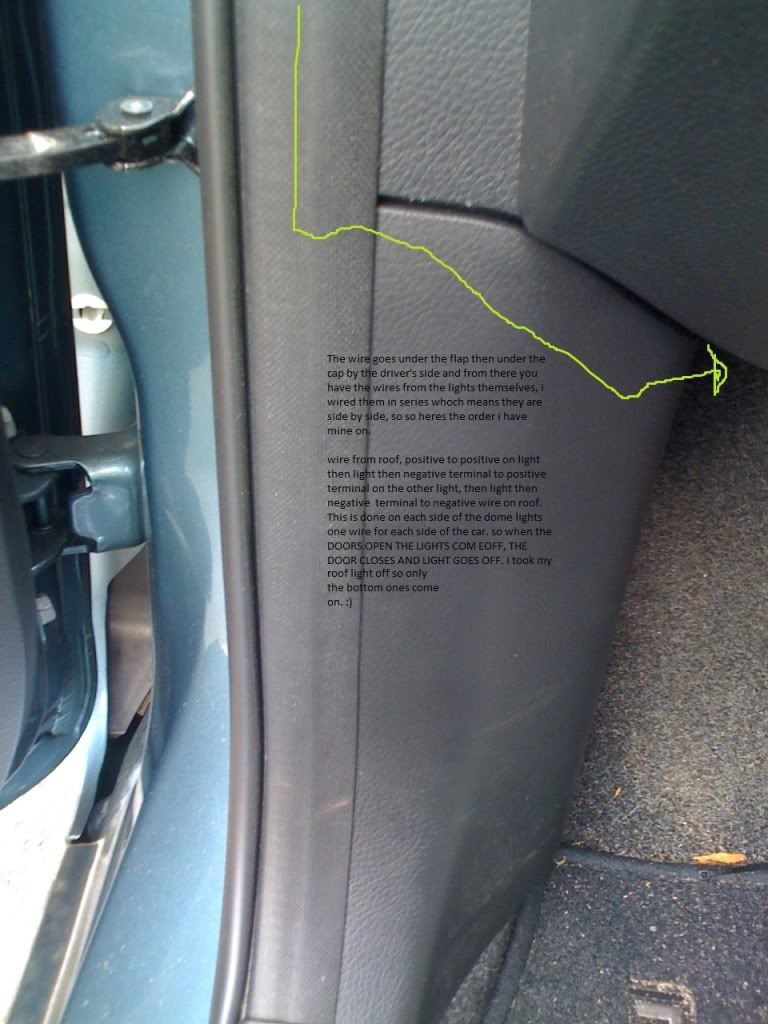
8. now before you go splicing and opening wires you gotta finish the bottom part. So work your way through that rubbery part its like a weather seal and pull it back and hide the wire within the opening, don't worry once you let go it pushes back into place. Keep working your way down until you reach the bottom around where the hood latch is, there is a sort of cap protecting all the wiring down there just hide the wire behind that cap for now.
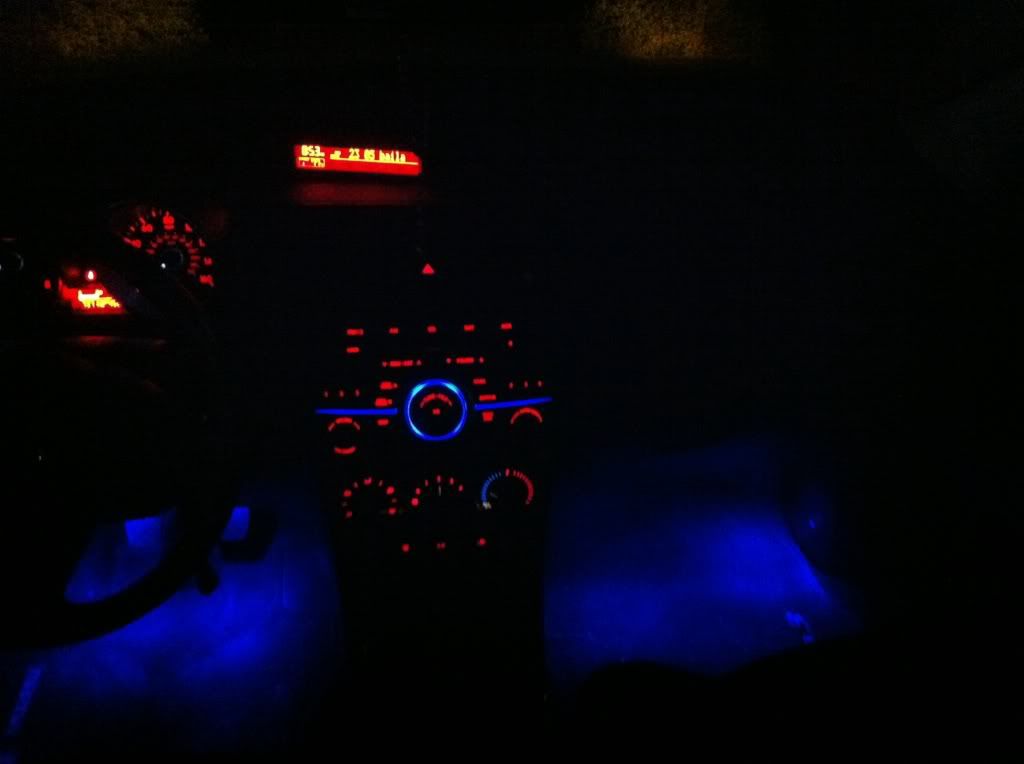
9. i wired the LEDs in series so i only needed one wire from the roof. for this you wire both lights together and then you end up with two terminals. so this is how its gonna look after its all sealed.
positive terminal from roof >> positive lead on led >> LED >> negative lead on led >>positive lead on led>>LED>>negative lead on led>>negative terminal from roof.
Using some electrical tape just make sure its nice and twisted tight for when you have to zip tie all these.
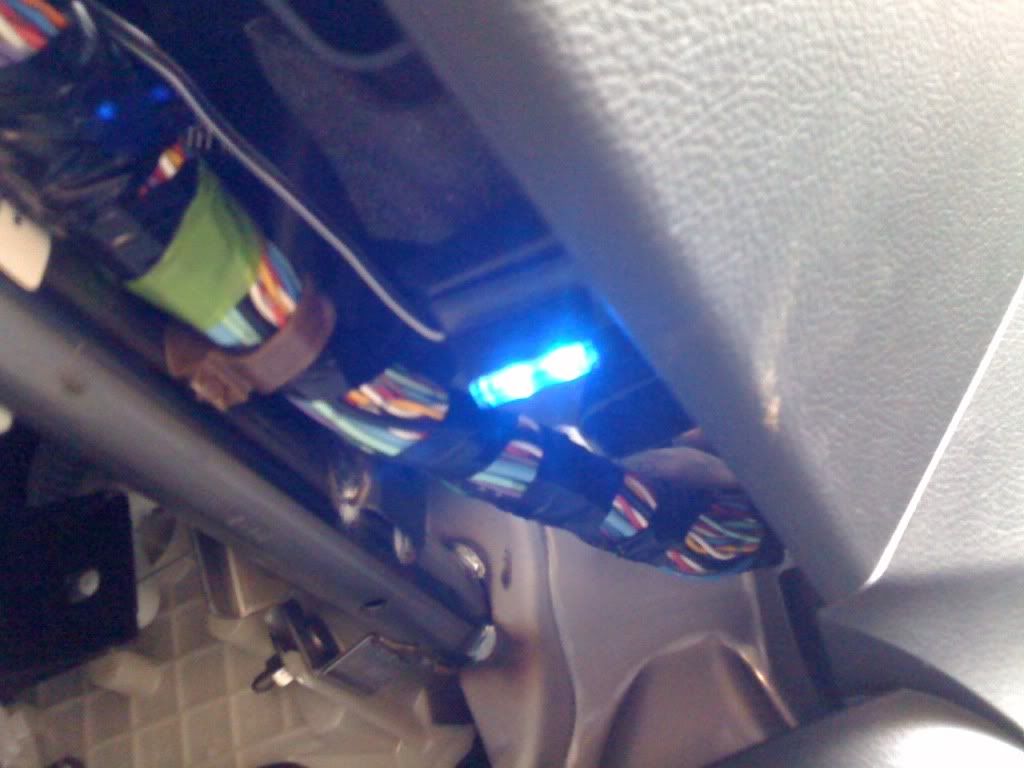
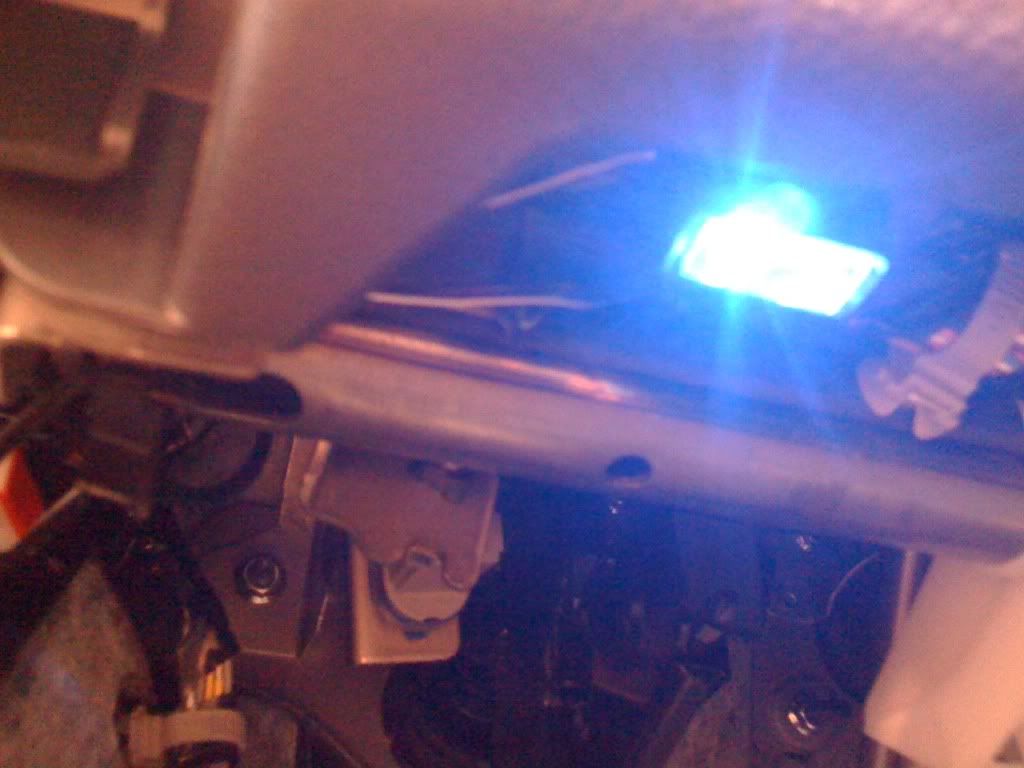
10. Find a place for the LEDs, i placed mine above the pedals towards the driver, there are these two plastic little tabs that would usually hold a plastic cap like the one on the passenger side, you'll know what i mean. i peeled the double sided tape and stuck em there really nice and hard make sure they are held on tight, press from the middle. (make sure they r out of sight and they are pointing down).
11. once this is all done go back up and behind where the light bulb is there is the circuitry board and all, i stripped my wires and wrapped the negative lead to the negative part of the light bulb terminal, and the positive lead to the positive terminal on the light. (because i didn't want the overhead light i took the bulb off, it'll still work, otherwise just leave it there for all the lights to turn on) Make sure you don't touch the positive wires to any negative leads and everything is nice and wrapped in electrical tape very well so theres minimal movement. Don't pop the housing back in just yet.
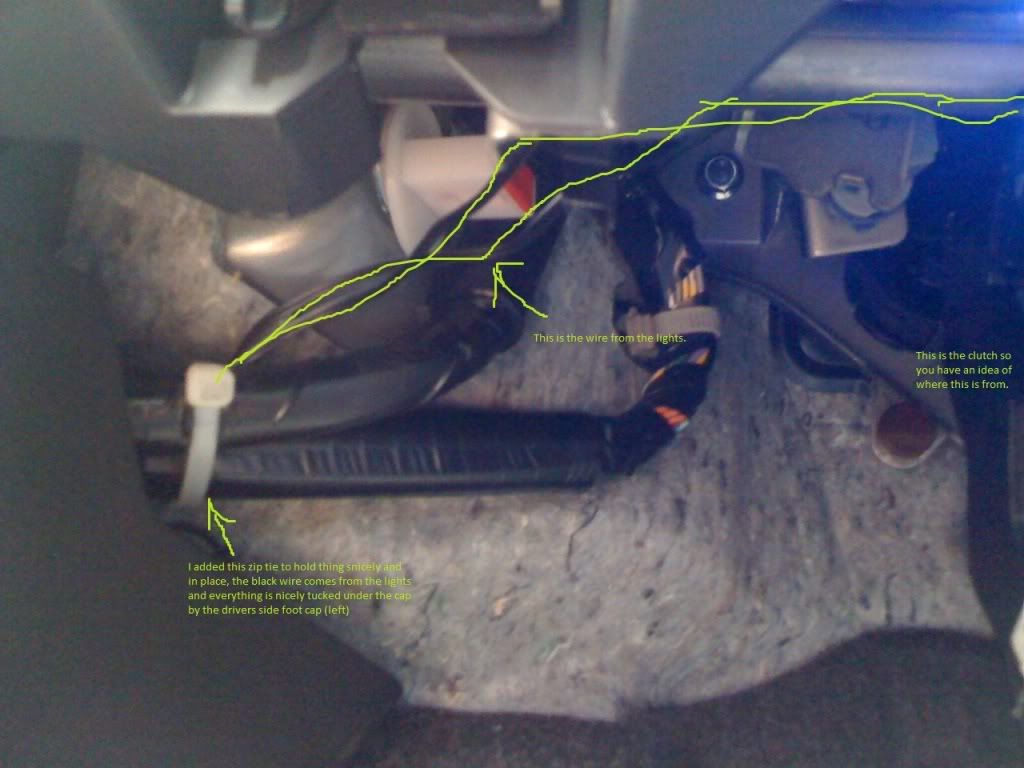
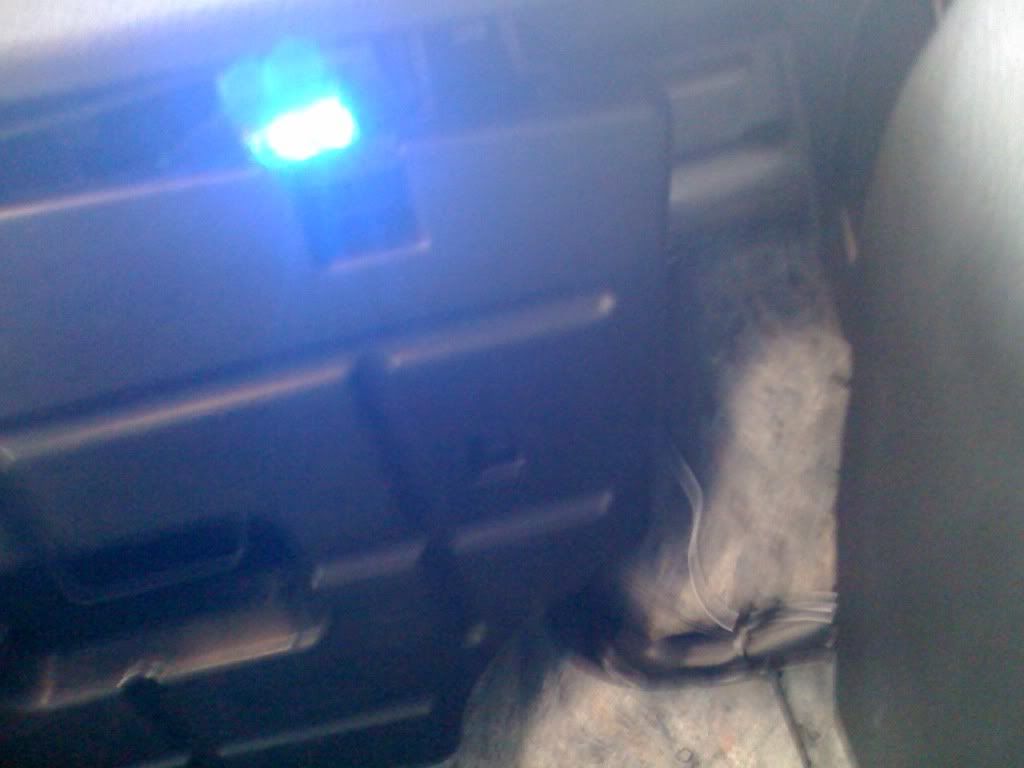
12. Go back down and zip tie all the wires that are hanging and if possible any wire thats lose zip tie it to any of the harnesses that are down there and zip tie everything together so it will fit nicely behind that cap we saw earlier the one to the left of the clutch. so its out of the way and its a clean looking install. cut the extras on the zip ties
and make sure the wires are out of sight. 13. Go back up and guess what.... Time to do the right side
repeat the steps as its pretty self explanatory once you have done one side. The LEDs are wired the same way, in series. and theres also a cap there to hide the wires too. My car had a plastic cap on the top where your feet go, i didn't stick my LEDs there cause i don't want them to get a good kicking from my friends, instead i stuck em to the holders where the cap is held onto, the same plastic tabs you did on the left side of the car, those r there too, just wiggle them in between these caps and they will be out of sight n make sure they r secure too. 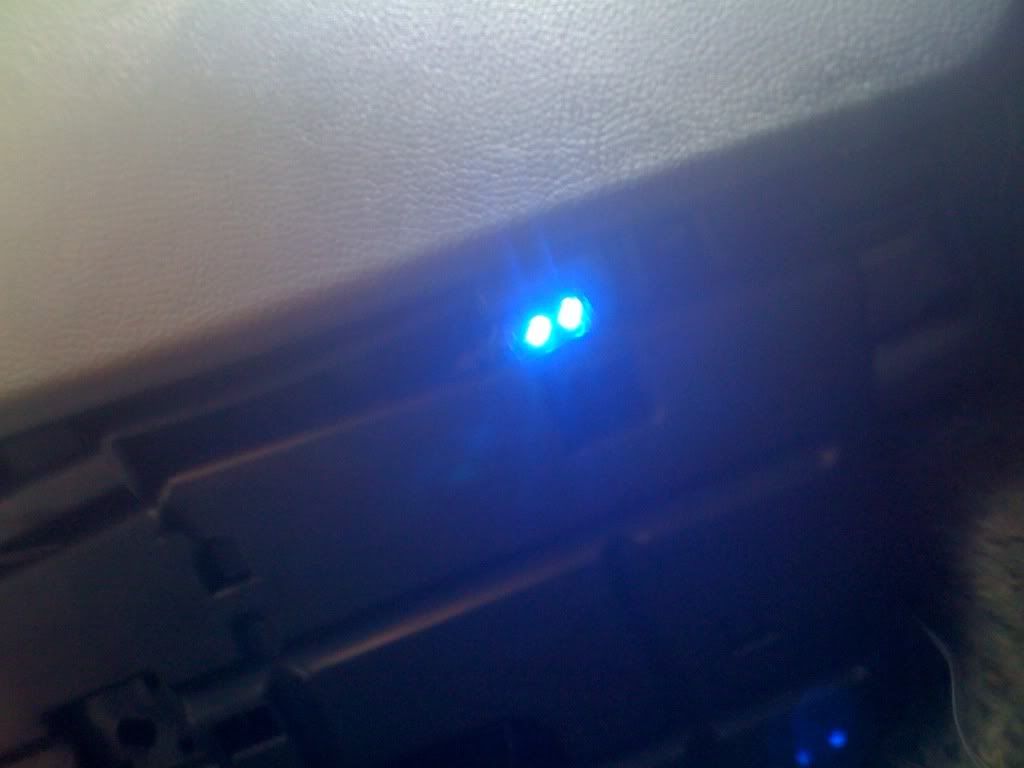
14. Tuck all the extra wiring inside of the lining in the roof and pop the Dome lights housing back in. Pop the lenses back in as well carefully as they seem fragile. Keep em off for now.
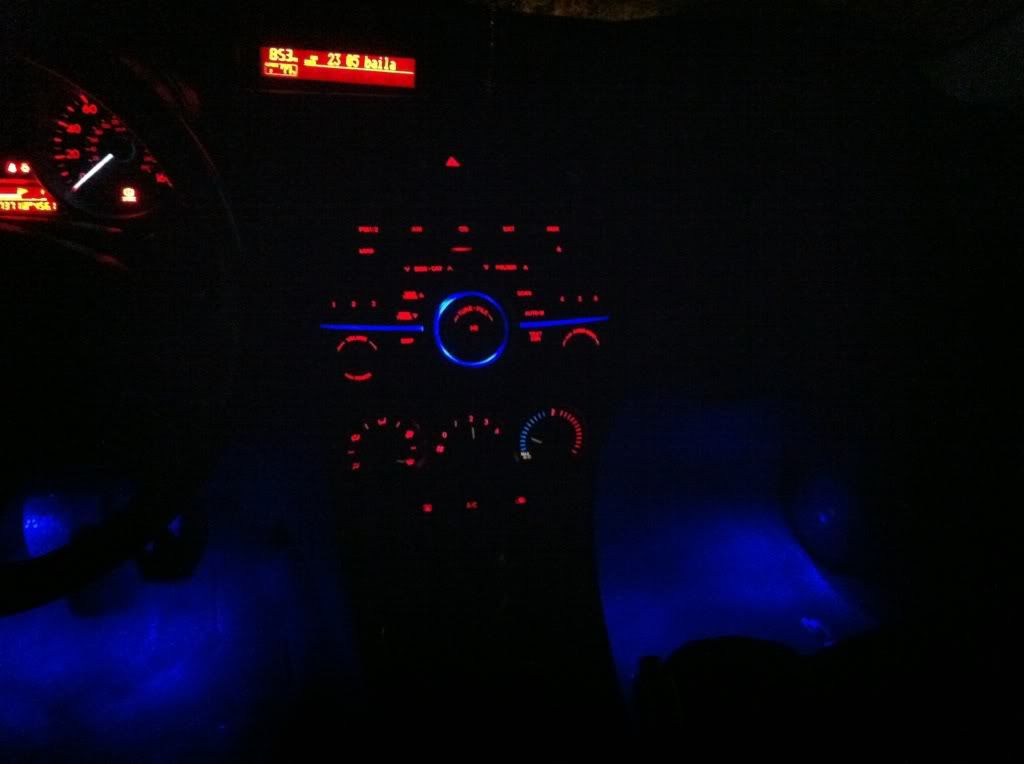
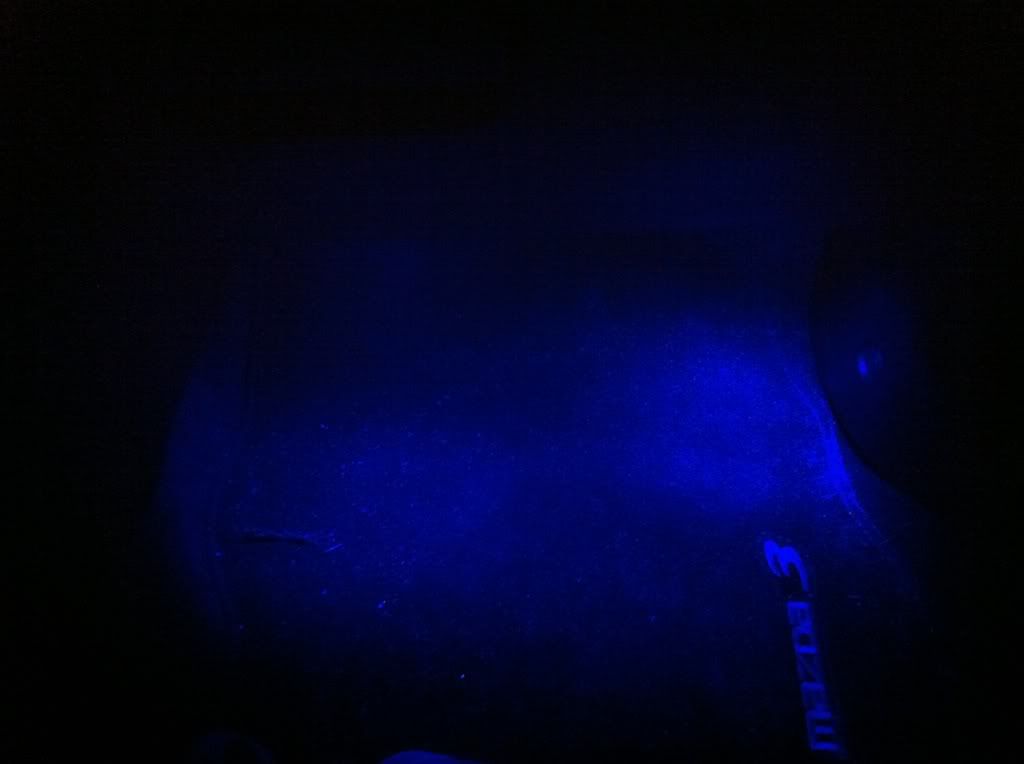
15. Connect the negative lead on the battery again and try em. keep the switch in the middle (door icon) and they should come on w/ the door open and off with the door closed. try them w/ the car on as well as the car off and make sure they are turning off when you are leaving the car without the key and all, pretend you are going back to the house just so they r working the way you want them so they don't drain your battery.
16. Check your patience level and go out for margaritas at night w/ ya girls to celebrate n test em
Cheers. PS. theres no need to take off your nails lol as i did w/ the LEDs on the bumper of the car.
Any questions PM or post here.
Emily